Home Assistant
In this step-by-step walkthrough, you'll build a conversational application for a smart home that allows users to control different devices and appliances.
Working through this blueprint will teach you how to
- handle a large number of domains and intents
- use system entities such as dates and times
- use roles in the entity hierarchy
Note
Please make sure to install and run all of the pre-requisites for MindMeld before continuing on with this blueprint tutorial.
1. The Use Case
Users should be able to interact with appliances and automated functions in their homes using natural language. They should be able to check the weather, set alarms, set timers, and control the lights, the doors, the thermostat, and various appliances in the house.
2. Example Dialogue Interactions
The conversational flows for home automation can be highly complex, depending on the desired app functionality and the amount of user guidance required at each step. Enumerating and finalizing all anticipated user interactions requires multiple iterations.
Here are some examples of scripted dialogue interactions for conversational flows.
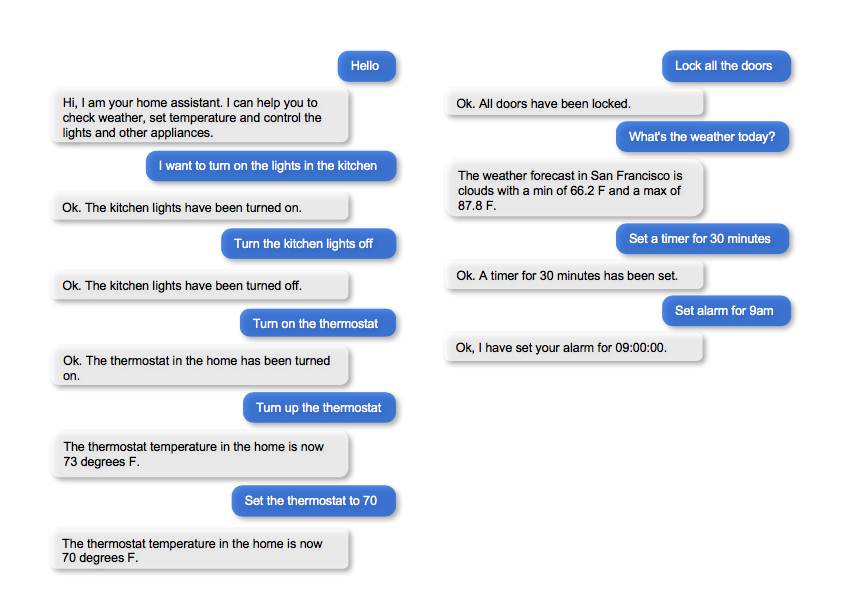
Exercise
Pick a convenient textual or graphical representation. Try to design as many user flows as you can. Always capture the entire dialogue from start to finish. Think of scenarios that differ from the examples above, such as: trying to control an appliance that does not exist in this house, asking for a five-day weather forecast, changing the instructions just given, and so on.
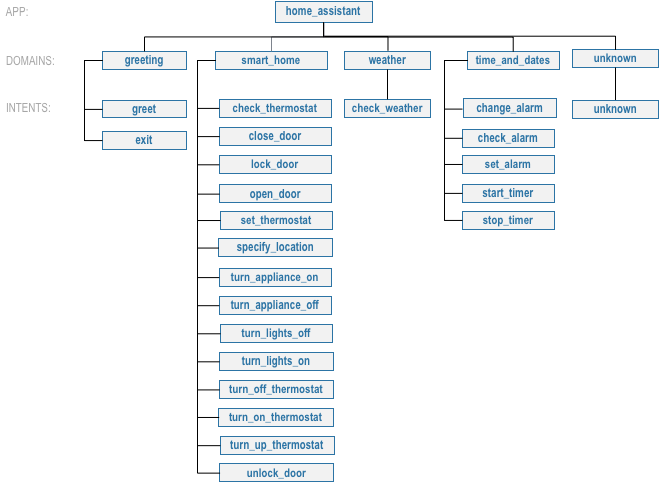
3. Domain-Intent-Entity Hierarchy
The home assistant blueprint is organized into five domains: Greeting, Smart Home, Time & Dates, Weather, and Unknown. Because the home assistant blueprint supports more activities, it requires more domains and intents than the Kwik-E-Mart blueprint does. For example, controlling the lights require two intents, one for turning on and one for turning off. Similar logic applies for turning on/off appliances, closing/opening doors, locking/unlocking doors, and so on.
The full list of intents for all domains is illustrated below.
There are two types of entities in MindMeld: System Entities and Custom Entities. System entities are pre-defined in MindMeld. Examples include sys_temperature, sys_time, and sys_interval. Custom entities are defined by the developers of each application. Within each entity folder, the file gazetteer.txt contains the full list of values for each custom entity.
Home assistant defines and uses the following custom entities, which are grouped by domains below:
- Smart Home
location: detects household location, for example: "lock {back|location} door"appliance: detects household appliances, for example: "can you turn on the {tv|appliance}?"all: detects whether the user is referring to all household locations, as opposed to a particular location, for example: "turn on the lights in {all|all} room" and "lock the doors {everywhere|all}".color: detects color of the lights, for example: "turn the lights to {soft white|color}"
- Time and dates
duration: detects time duration, for example: "{15 minute|duration} alarm"interval: detects time interval, for example: "cancel {tomorrow night|interval} s alarms"
- Weather
city: detects cities, for example: "what is the weather in {shanghai|city}"unit: detects weather unit, for example: "what is the forecast for {london|city} in {celsius|unit}"
Home assistant uses three system entities: sys_time (time), sys_interval (interval) and sys_temperature (temperature). Some examples for annotation with system entities: "set my thermostat to turn on at {6 am|sys_time}" and "turn the heat off at {76 degrees|sys_temperature}".
Queries can include more than one entity of the same type. In "change my alarm from 7 am to 6 am", for example, both "7 am" and "6 am" are sys_time entities. Just labeling both entities with the same type does not give MindMeld enough information to understand the meaning of the query. We need to show the different roles that these two sys_time entities play in creating meaning. One is an "old time" that the alarm was set to, and the other is a "new time" that the user wants as a new setting for the alarm. We annotate the example as "change alarm from {7 am|sys_time|old_time} to {6 am|sys_time|new_time}." This way, MindMeld can interpret each entity correctly. See Role Classifier.
Exercise
While the blueprint provides a good starting point, you may need additional intents and entities to support the desired scope of your app. Enumerate some other intents (e.g., dim_lights, check_windows, and so on) and entities (e.g., awning, driveway, and so on) that make sense for a home automation use case.
To train the different machine learning models in the NLP pipeline for this app, we need labeled training data that covers all our intents and entities. To download the data and code required to run this blueprint, run the command below in a directory of your choice. (If you have already completed the Quick Start for this blueprint, you should skip this step.)
python -c "import mindmeld as mm; mm.blueprint('home_assistant');"
This should create a MindMeld project folder called home_assistant in your current directory with the following structure:

4. Dialogue States
Dialogue state logic can be arbitrarily complex. Simple dialogue state handlers just return a canned text response, while sophisticated ones can call third party APIs, calculate state transitions, and return complex responses.
MindMeld supports two ways to organize dialogue states in the Dialogue Manager:
- Define one dialogue state for each intent, as seen in the Kwik-E-Mart blueprint. This is the simplest approach, but can lead to duplicated code.
- Define one dialogue state for multiple intents. This requires more work up front, but helps you consolidate duplicated dialogue state logic.
Which approach is best varies from one application to another. Figuring that out always requires some trial and error. We will explore both options in detail.
Let's begin by defining a dialogue state for each of the intents for controlling doors (close_door, open_door, lock_door, and unlock_door):
@app.handle(intent='close_door')
def close_door(request, responder):

    ...

@app.handle(intent='open_door')
def open_door(request, responder):

    ...

@app.handle(intent='lock_door')
def lock_door(request, responder):

    ...

@app.handle(intent='unlock_door')
def unlock_door(request, responder):

    ...
Observe that the controller logic (for example, setting the state variable for the door) is very similar for all four intents. That means we have an opportunity to define a single state, handle_door, for all of these intents:
@app.handle(intent='close_door')
@app.handle(intent='open_door')
@app.handle(intent='lock_door')
@app.handle(intent='unlock_door')
def handle_door(request, responder):

    ...
Exercise
Analyze the way the home assistant blueprint uses the patterns one dialogue state for each intent and one dialogue state for multiple intents. Why is one pattern used in some situations and the other used in others?
Sometimes a dialogue state handler needs to be aware of the context from a previous state. This happens in the follow-up request pattern. Consider this conversational interaction:
User: Turn on the lights.
App: Sure. Which lights?
User: In the kitchen
Observe that the first request leaves out some required information — the location of the light to turn on. Therefore, in the response, the application must prompt the user for the missing information. Most importantly, the app needs to "remember" context from the first request to understand the user's second request, in which the user specifies the information that was missing.
Here is how the home assistant blueprint implements this pattern:
- Define the
specify_locationintent - Define the
specify_locationstate - Since multiple states (
close/open door,lock/unlock door,turn on/off lights,turn on/off appliance,check door/light) can lead to thespecify locationstate, pass the previous state/action information in the request object, asrequest.frame['desired_action']
The code for specify_location looks like this:
@app.handle(intent='specify_location')
def specify_location(request, responder):
    selected_all = False
    selected_location = _get_location(request)

    if selected_location:
        try:
            if request.frame['desired_action'] == 'Close Door':
                reply = _handle_door_open_close_reply(selected_all, selected_location, request,
                                                      desired_state="closed")
            elif request.frame['desired_action'] == 'Open Door':
                reply = _handle_door_open_close_reply(selected_all, selected_location, request,
                                                      desired_state="opened")
            elif request.frame['desired_action'] == 'Lock Door':
                reply = _handle_door_lock_unlock_reply(selected_all, selected_location, request,
                                                       desired_state="locked")
            elif request.frame['desired_action'] == 'Unlock Door':
                reply = _handle_door_lock_unlock_reply(selected_all, selected_location, request,
                                                       desired_state="unlocked")
            elif request.frame['desired_action'] == 'Check Door':
                reply = _handle_check_door_reply(selected_location, responder)
            elif request.frame['desired_action'] == 'Turn On Lights':
                color = _get_color(request) or request.frame.get('desired_color')
                reply = _handle_lights_reply(selected_all, selected_location, responder,
                                             desired_state="on", color=color)
            elif request.frame['desired_action'] == 'Turn Off Lights':
                reply = _handle_lights_reply(selected_all, selected_location, responder,
                                             desired_state="off")
            elif request.frame['desired_action'] == 'Check Lights':
                reply = _handle_check_lights_reply(selected_location, responder)
            elif request.frame['desired_action'] == 'Turn On Appliance':
                selected_appliance = request.frame['appliance']
                reply = _handle_appliance_reply(selected_all, selected_location, selected_appliance,
                                                desired_state="on")
            elif request.frame['desired_action'] == 'Turn Off Appliance':
                selected_appliance = request.frame['appliance']
                reply = _handle_appliance_reply(selected_all, selected_location, selected_appliance,
                                                desired_state="off")
        except KeyError:
            reply = "Please specify an action to go along with that location."

        responder.reply(reply)
    else:
        reply = "I'm sorry, I wasn't able to recognize that location, could you try again?"
        responder.reply(reply)
Here are the intents and states in the home assistant blueprint, as defined in the application dialogue handler modules in the blueprint folder.
| Intent | Dialogue State Name | Dialogue State Function |
|---|---|---|
greet |
greet |
Begin an interaction and welcome the user |
check_weather |
check_weather |
Check the weather |
check_door |
check_door |
Check the door |
close_door |
close_door |
Close the door |
open_door |
open_door |
To open the door |
lock_door |
lock_door |
To lock the door |
unlock_door |
unlock_door |
Unlock the door |
turn_appliance_on |
turn_appliance_on |
Turn the appliance on |
turn_appliance_off |
turn_appliance_off |
Turn the appliance off |
check_lights |
check_lights |
Check the lights |
turn_lights_on |
turn_lights_on |
Turn the lights on |
turn_lights_off |
turn_lights_off |
Turn the lights off |
check_thermostat |
check_thermostat |
Check the thermostat |
set_thermostat |
set_thermostat |
Set the thermostat |
turn_up_thermostat, turn_down_thermostat |
change_thermostat |
Change the thermostat |
change_alarm |
change_alarm |
Change the alarm |
check_alarm |
check_alarm |
Check the alarm |
remove_alarm |
remove_alarm |
Remove the alarm |
set_alarm |
set_alarm |
Set the alarm |
start_timer |
start_timer |
Start the timer |
stop_timer |
stop_timer |
Stop the timer |
specify_location |
specify_location |
Specify locations in the house |
specify_time |
specify_time |
Specify the time in the follow up questions |
exit |
exit |
End the current interaction |
unknown |
unknown |
Prompt a user who has gone off-topic to get back to food ordering |
5. Knowledge Base
Since the home assistant is a straightforward command-and-control application, it has no product catalog, and therefore does not need a knowledge base.
6. Training Data
The labeled data for training our NLP pipeline was created using a combination of in-house data generation and crowdsourcing techniques. This is a highly important multi-step process that is described in more detail in Step 6 of the Step-By-Step Guide. Be aware that at minimum, the following data generation tasks are required:
Purpose
|
Question (for crowdsourced data generators)
or instruction (for annotators)
|
|---|---|
Exploratory data generation
for guiding the app design
|
"How would you talk to a conversational app
to control your smart home appliances?"
|
Generate queries for training
Domain and Intent Classifiers
|
change_alarm intent (times_and_dates domain):"What would you say to the app to change your alarm time
from a previous set time to a new set time?"
set_alarm intent (times_and_dates domain):"What would you say to the app
to set a new alarm time?"
|
Annotate queries
for training the Entity Recognizer
|
set_alarm: "Annotate all occurrences ofsys_time and sys_interval system entities in the given query" |
Annotate queries
for training the Role Classifier
|
set_alarm: "Annotate all entities with theircorresponding roles, when needed, e.g.,
old_time, new_time" |
Generation synonyms for gazetteer generation
to improve entity recognition accuracies
|
city entity: "Enumerate a list of names of cities"location entity: "What are some names oflocations in your home?"
|
In summary, the process is this:
- Start with an exploratory data generation process, collecting varied examples of how the end user would interact with the app.
- Cluster the data into different domains based on functionality. For example, the home assistant application has to control appliances in a smart home, check the weather and control a smart alarm, so we divide these functions into the following domains:
greeting,smart_home,times_and_dates, andweather. - Once we establish a clear domain-intent-entity-role hierarchy, generate labeled data for each component in the hierarchy.
The domains directory contains the training data for intent classification and entity recognition. The entities directory contains the data for entity resolution. Both directories are at root level in the blueprint folder.
Exercise
- Read Step 6 of the Step-By-Step Guide for best practices around training data generation and annotation for conversational apps. Following those principles, create additional labeled data for all the intents in this blueprint and use them as held-out validation data for evaluating your app. You can read more about NLP model evaluation and error analysis in the user guide.
- To train NLP models for your own home assistant application, you can start by reusing the blueprint data for generic intents like
greetandexit. However, for core intents likecheck_weatherin theweatherdomain, it's recommended that you collect new training data that is tailored towards the entities (city,duration) that your application needs to support. Follow the same approach to gather new training data for thecheck_weatherintent or any additional intents and entities needed for your application.
7. Training the NLP Classifiers
Train a baseline NLP system for the blueprint app. The build() method of the NaturalLanguageProcessor class, used as shown below, applies MindMeld's default machine learning settings.
from mindmeld.components.nlp import NaturalLanguageProcessor
import mindmeld as mm
mm.configure_logs()
nlp = NaturalLanguageProcessor(app_path='home_assistant')
nlp.build()
Fitting domain classifier
Loading queries from file weather/check_weather/train.txt
Loading queries from file times_and_dates/remove_alarm/train.txt
Loading queries from file times_and_dates/start_timer/train.txt
Loading queries from file times_and_dates/change_alarm/train.txt
.
.
.
Fitting intent classifier: domain='greeting'
Selecting hyperparameters using k-fold cross validation with 5 splits
Best accuracy: 99.31%, params: {'fit_intercept': False, 'C': 1, 'class_weight': {0: 1.5304182509505702, 1: 0.88306789606035196}}
Fitting entity recognizer: domain='greeting', intent='exit'
No entity model configuration set. Using default.
Fitting entity recognizer: domain='greeting', intent='greet'
No entity model configuration set. Using default.
Fitting entity recognizer: domain='unknown', intent='unknown'
No entity model configuration set. Using default.
Fitting intent classifier: domain='smart_home'
Selecting hyperparameters using k-fold cross validation with 5 splits
Best accuracy: 98.43%, params: {'fit_intercept': True, 'C': 100, 'class_weight': {0: 0.99365079365079367, 1: 1.5915662650602409, 2: 1.3434782608695652, 3: 1.5222222222222221, 4: 0.91637426900584784, 5: 0.74743589743589745, 6: 1.9758620689655173, 7: 1.4254901960784312, 8: 1.0794871794871794, 9: 1.0645320197044335, 10: 1.1043715846994535, 11: 1.2563909774436088, 12: 1.3016260162601625, 13: 1.0775510204081633, 14: 1.8384615384615384}}
Tip
During active development, it helps to increase the MindMeld logging level to better understand what is happening behind the scenes. All code snippets here assume that logging level is set to verbose.
To see how the trained NLP pipeline performs on a test query, use the process() method.
nlp.process("please set my alarm to 8am for tomorrow")
{ 'domain': 'times_and_dates',
  'entities': [ { 'role': None,
                  'span': {'end': 38, 'start': 23},
                  'text': '8am for tomorrow',
                  'type': 'sys_time',
                  'value': [ { 'grain': 'hour',
                               'value': '2019-02-16T08:00:00.000-08:00'}]}],
  'intent': 'set_alarm',
  'text': 'please set my alarm to 8am for tomorrow'
}
Inspect classifiers in baseline configuration
For the data distributed with this blueprint, the baseline performance is already high. However, when extending the blueprint with your own custom home assistant data, you may find that the default settings may not be optimal and you can get better accuracy by individually optimizing each of the NLP components.
Because the home assistant app has five domains and over twenty intents, the classifiers need a fair amount of fine-tuning.
Start by inspecting the baseline configurations that the different classifiers use. The User Guide lists and describes the available configuration options. As an example, the code below shows how to access the model and feature extraction settings for the Intent Classifier.
ic = nlp.domains['smart_home'].intent_classifier
ic.config.model_settings['classifier_type']
'logreg'
ic.config.features
{'bag-of-words': {'lengths': [1, 2]},
 'edge-ngrams': {'lengths': [1, 2]},
 'exact': {'scaling': 10},
 'freq': {'bins': 5},
 'gaz-freq': {},
 'in-gaz': {}
}
You can experiment with different learning algorithms (model types), features, hyperparameters, and cross-validation settings, by passing the appropriate parameters to the classifier's fit() method. Intent classifer and role classifier examples follow.
Experiment with the intent classifiers
We can change the feature extraction settings to use bag of trigrams in addition to the default bag of words:
ic.config.features['bag-of-words']['lengths'].append(3)
ic.fit()
Fitting intent classifier: domain='smart_home'
Selecting hyperparameters using k-fold cross-validation with 5 splits
Best accuracy: 97.95%, params: {'C': 100, 'class_weight': {0: 2.1058169934640523, 1: 2.1058169934640523, 2: 0.9449346405228759, 3: 2.2581148121899366, 4: 1.7132480818414322, 5: 2.1058169934640523, 6: 0.7752149982800138, 7: 0.4041150092323926, 8: 2.234803921568627, 9: 1.4608823529411765, 10: 1.1334539969834088, 11: 1.100608519269777, 12: 1.1785055643879174, 13: 1.521981424148607, 14: 1.6213295074127212, 15: 1.129201680672269, 16: 2.8003619909502264}, 'fit_intercept': True}
We can also change the model for the intent classifier to Support Vector Machine (SVM) classifier, which works well for some datasets:
search_grid = {
   'C': [0.1, 0.5, 1, 5, 10, 50, 100, 1000, 5000],
   'kernel': ['linear', 'rbf', 'poly']
}

param_selection_settings = {
     'grid': search_grid,
     'type': 'k-fold',
     'k': 10
}

ic = nlp.domains['smart_home'].intent_classifier
ic.fit(model_settings={'classifier_type': 'svm'}, param_selection=param_selection_settings)
Fitting intent classifier: domain='smart_home'
Loading queries from file smart_home/check_lights/train.txt
Loading queries from file smart_home/specify_location/train.txt
Loading queries from file smart_home/turn_appliance_off/train.txt
Loading queries from file smart_home/check_thermostat/train.txt
Loading queries from file smart_home/set_thermostat/train.txt
Loading queries from file smart_home/turn_up_thermostat/train.txt
Loading queries from file smart_home/turn_lights_on/train.txt
Loading queries from file smart_home/unlock_door/train.txt
Loading queries from file smart_home/turn_on_thermostat/train.txt
Loading queries from file smart_home/lock_door/train.txt
Loading queries from file smart_home/turn_down_thermostat/train.txt
Unable to load query: Unable to resolve system entity of type 'sys_time' for '12pm'.
Loading queries from file smart_home/close_door/train.txt
Loading queries from file smart_home/turn_lights_off/train.txt
Loading queries from file smart_home/open_door/train.txt
Loading queries from file smart_home/turn_off_thermostat/train.txt
Loading queries from file smart_home/turn_appliance_on/train.txt
Selecting hyperparameters using k-fold cross-validation with 10 splits
Best accuracy: 98.27%, params: {'C': 5000, 'kernel': 'rbf'}
Similar options are available for inspecting and experimenting with the Entity Recognizer and other NLP classifiers as well. Finding the optimal machine learning settings is an iterative process involving several rounds of parameter tuning, testing, and error analysis. Refer to the NaturalLanguageProcessor in the user guide for more about training, tuning, and evaluating the various MindMeld classifiers.
Inspect the role classifiers
The home assistant application has role classifiers to distinguish between different role labels. For example, the annotated data in the times_and_dates domain and check_alarm intent has two types of roles: old_time and new_time. The role classifier detects these roles for the sys_time entity:
nlp.domains["times_and_dates"].intents["change_alarm"].load()
nlp.domains["times_and_dates"].intents["change_alarm"].entities["sys_time"].role_classifier.fit()
nlp.domains["times_and_dates"].intents["change_alarm"].entities["sys_time"].role_classifier.evaluate()
<StandardModelEvaluation score: 100.00%, 21 of 21 examples correct>
In the above case, the role classifier was able to correctly distinguish between new_time and old_time for all test cases.
Inspect the configuration
The application configuration file, config.py, at the top level of the home assistant folder, contains custom intent and domain classifier model configurations. These are defined as dictionaries named DOMAIN_CLASSIFIER_CONFIG and INTENT_CLASSIFIER_CONFIG, respectively; other dictionaries include ENTITY_RECOGNIZER_CONFIG and ROLE_CLASSIFIER_CONFIG. If no custom model configuration is added to config.py file, MindMeld uses its default classifier configurations for training and evaluation. Here is an example of an intent configuration:
INTENT_CLASSIFIER_CONFIG = {
    'model_type': 'text',
    'model_settings': {
        'classifier_type': 'logreg'
    },
    'param_selection': {
        'type': 'k-fold',
        'k': 5,
        'grid': {
            'fit_intercept': [True, False],
            'C': [0.01, 1, 10, 100],
            'class_bias': [0.7, 0.3, 0]
        }
    },
    'features': {
        "bag-of-words": {
            "lengths": [1, 2]
        },
        "edge-ngrams": {"lengths": [1, 2]},
        "in-gaz": {},
        "exact": {"scaling": 10},
        "gaz-freq": {},
        "freq": {"bins": 5}
    }
}
Exercise
Experiment with different models, features, and hyperparameter selection settings to see how they affect the classifier performance. Maintain a held-out validation set to evaluate your trained NLP models and analyze the misclassified test instances. Then use observations from the error analysis to inform your machine learning experimentation. For more on this topic, refer to the User Guide.
8. Parser Configuration
The relationships between entities in the home assistant queries are simple ones. For example, in the annotated query is the {back|location} door closed or open, the location entity is self-sufficient, in that it is not described by any other entity.
If you extended the app to support queries with more complex entity relationships, it would be necessary to specify entity groups and configure the parser accordingly. For example, in the query is the {green|color} {back|location} door closed or open, we would need to relate the color entity to the location entity, because one entity describes the other. The related entities would form an entity group. For more about entity groups and parser configurations, see the Language Parser chapter of the User Guide.
Since we do not have entity groups in the home assistant app, we do not need a parser configuration.
9. Using the Question Answerer
The Question Answerer component in MindMeld is mainly used within dialogue state handlers for retrieving information from the knowledge base. Since the home assistant app has no knowledge base, no question answerer is not needed.
10. Testing and Deployment
Once all the individual pieces (NLP, Dialogue State Handlers) have been trained, configured or implemented, perform an end-to-end test of the app using the Conversation class.
from mindmeld.components.dialogue import Conversation
conv = Conversation(nlp=nlp, app_path='home_assistant')
conv.say('set alarm for 6am')
['Ok, I have set your alarm for 06:00:00.']
The say() method:
- packages the input text in a user request object
- passes the object to the MindMeld Application Manager to a simulate an external user interaction with the app, and
- outputs the textual part of the response sent by the dialogue manager.
In the above example, we requested to set an alarm for 6 AM and the app responded, as expected, by confirming that the alarm was set.
Try a multi-turn dialogues:
>>> conv = Conversation(nlp=nlp, app_path='home_assistant')
>>> conv.say('Hi there!')
['Hi, I am your home assistant. I can help you to check weather, set temperature and control the lights and other appliances.]
>>> conv.say("close the front door")
['Ok. The front door has been closed.']
>>> conv.say("set the thermostat for 60 degrees")
['The thermostat temperature in the home is now 60 degrees F.']
>>> conv.say("decrease the thermostat by 5 degrees")
['The thermostat temperature in the home is now 55 degrees F.']
>>> conv.say("open the front door")
['Ok. The front door has been opened.']
>>> conv.say("Thank you!")
['Bye!']
Alternatively, enter conversation mode directly from the command-line.
python -m home_assistant converse
You: What's the weather today in San Francisco?
App: The weather forecast in San Francisco is clouds with a min of 62.6 F and a max of 89.6 F
Exercise
Test the app and play around with different language patterns to discover edge cases that our classifiers are unable to handle. The more language patterns we can collect in our training data, the better our classifiers can handle in live usage with real users. Good luck and have fun - now you have your very own Jarvis!